# Home
Welcome to the home of Node Orbit documentation.
# FAQs
#### How do I know if I set up my node correctly?
If the status says READY, then you've done everything properly. Some projects take over 48 hours to get a reward. All nodes are in a queue so there's no expediting this process. A new address will be created automatically and rewards will go in there. You won't see this address until after first payout.
#### Error: Please enter the wallet passphrase with walletpassphrase first. (code -13)
Settings -> Unlock
#### Someone asked me to run the dumpprivkey command from my wallet
That person is a scammer. This command outputs your private key, which can be used to access your funds. DO NOT send this to anyone.
#### Waiting for ProTx to appear on-chain
You'll need to wait for the block height to sync to the main chain. Afterwards it should switch to Ready.
#### error code: -28 error message: Loading block index...
The processes are just loading
#### bad-protx-operator-payee (code 16) (code -1)
You may have put in an address for the 4th variable in the protx command when it should be just double quotes ""
#### How do I unlock a node?
Activate the Coin Control features under settings -> options -> wallet.
To unlock a node, click Send--->Inputs---rclick on the address you want to unlock--->Unlock it-->put a check next to that line-->click OK-->then send some or all of that to a new address, this will kill the node.
#### How can I see my smartnode in my wallet?
Settings -> wallet -> enable coin control and smartnodes
#### invalid collateral amount: amount=1 (code -50)
Take the transaction ID into the project's explorer and look at the transaction. You may have pasted the wrong transaction ID altogether, or used the wrong index value (0 or 1) when building your protx command.
**NOTE**: If the required collateral is 600,000, it needs to be sent in a single transaction with that amount. It doesn't matter if you have more than the required collateral in the address.
#### I can't see my payout address. Do I need to set one up?
Your payout address will automatically get created for you once you receive your first reward.
#### When will I get my reward?
For Neoxa, it can take up to 48 hours. If the status of your node is Ready you've done everything correctly, so be patient and it will arrive.
#### Error: Invalid value. Must be a 64 character hex value.
You probably pasted the wrong thing. Make sure to paste just the key inside the quotes.
#### Do I need to keep my PC on and wallet open?
No
#### Local address does not match the address from ProTx
You may have submitted the wrong IP or Port when registering your node. You'll need to run the protx [update\_service](/neoxa/neoxa-getting-started/additional-resources) command from your wallet
#### I can't seem to open the wallet on my MAC
Start the terminal in the folder where your neoxa-qt (replace with other project's qt file) is and type sudo chmod +x neoxa-qt enter your systempassword and you can open afterwards.
#### Can I run more than one node in a wallet?
Yes, for QT wallets, you want to save them to different addresses so your collateral is seperated between your nodes.
#### The collateral requirements have changed, what do I need to do?
Activate the Coin Control features under settings -> options -> wallet.
Restart your wallet and go to send. Click on Inputs under Coin Control Features. Click on toggle lock state and you will see that you can now select your node with the old collateral amount. Select this and click on OK.
Send this amount to a normal address with the button use available balance. Wait for confirmation, at least 1 block.
Restart your wallet.
Now you can create a new node using the procedure you are familiar with.
#### The collateral requirements have changed from 900,000 to 1.1M. Can I just send 200,000 more to the collateral address?
No, the nodes work by looking at transactions on the blockchain. If the collateral amount is 1.1M, then it needs to be sent in one transaction. If you need to unlock the original node amount, then look above for the steps to unlock a node.
#### My wallet says that it cannot connect to any peers.
Follow the instructions here: to add a node to your wallet. You may have to grab an existing node's IP from the explorer so that it can find additional peers.
#### bad-protx-ipaddr (code 16) (code -1)
Double check the IP address is the right one from the dashboard.
#### bad-protx-dup-key
You probably have 2+ nodes and when trying to register your second, you have used the same key accidentally twice.
# Flux - Getting Started
This overview assumes you already have a Zelcore wallet with enough Flux to cover the collateral for your node.
{% embed url="" %}
Check out JustNode's walk-through of setting up your flux node.
{% endembed %}
## Steps to Get Started
The following steps will help you retrieve the 4 required fields and 1 optional fields from your Zelcore wallet.
### Finding your FluxNode Configuration Detail
From Zelcore, go to Apps -> FluxNodes
You will then see an map of the world and the bottom section should show all available Flux Nodes linked to your Zelcore. If you don't see your node, please go [here](/flux/flux-getting-started/faqs#why-doesnt-my-node-show-up-in-my-zelcore-wallet).
Expand open the list of nodes and click the Edit button.
This window has three required fields to start your node: Identity Key, Collateral TX ID and Output Index. Click on each to copy to your clipboard to paste into your shopping cart.
### Retrieving your Flux ID
From Zelcore, go to Apps -> Flux ID.
Click on the QR code and your Flux ID will be saved to your clipboard.
### Purchasing Your Node
You now have the three required fields and the two optional fields and are ready to complete your checkout. Head back to nodeorbit.com with this information to complete your checkout process.
### Node Provisioning
You will see on the dashboard your node start to get provisioned and when it's ready you will receive an email with your node's IP address.
***Before starting your node in Zelcore, please take these two steps to make sure your node is ready to start.***
Go to your FluxNode and verify that the node has passed benchmarks by navigating to Benchmark -> FluxNode -> Get Benchmarks. The status should state Cumulus, Nimbus or Stratus depending on your purchased tier.
Go to your FluxNode and verify you're in the right node. From your homepage, go to Daemon -> FluxNode -> Get FluxNode Status. Double check the TX Hash is the same as what you sent over.
Once you have verified these two steps, you'll simply need to wait until you reach over 100 confirmations to start your node. Each confirmation takes roughly two minutes so use that to estimate when you need to continue. Log back into Zelcore and navigate to Apps -> FluxNodes -> My FluxNodes. If you are over 100 confirmations you will have a button that says Start. Click that and then you should be good to go. Put in whatever name you want and for IP use 0.0.0.0 and just let the blockchain update it.
That's it! The rest is on us to monitor, handle updates, upgrades and ensure everything is running smoothly.
# Additional Resources
We use the following resources daily and recommend you bookmark and use them too. All have been put together by Flux community members.
{% embed url="" %}
Get an idea of potential returns with each node tier.
{% endembed %}
{% embed url="" %}
Easily see when your node's rank. Save your wallet address to access easily.
{% endembed %}
{% embed url="" %}
View node rank and benchmark data. Save your wallet address to access easily.
{% endembed %}
# FAQs
### Why doesn't my node show up in my Zelcore wallet?
You probably did not send the required collateral in a single transaction. If you send 600 then 400, the system won't know that you're trying to create a new Cumulus node so it doesn't matter that you have more than the required amount to run a node. Send the EXACT amount for your node tier in a single transaction, even if you send from the one wallet to the exact same wallet.
### Can I pay in crypto?
Yes! From the Node Orbit discord, simply create a support ticket and we'll walk through the process manually.
### When do we receive a payout for running a node?
Each node is placed into a queue and each node moves up about once every two minutes. The Node Orbit dashboard will show you your rank and when you will get paid. Also, check the additional [resources page ](/flux/flux-getting-started/additional-resources)to see other ways to see your rank.
### What IP address do I put into Zelcore?
Just put 0.0.0.0 and let the blockchain update it automatically. You can name your node whatever you'd like.
### What wallet do I use within Zelcore?
You can use any of the wallets. We recommend using the same wallet if you're running multiple nodes so that you reduce your fees when claiming parallel assets.
### Can I upgrade my node from a Cumulus to a Nimbus?
Yes, create a ticket to let us know your intentions and we'll credit back your lower tier node. Everyone running a Cumulus will thank you for this.
### What will I need to provide to start running a node?
I need your identity key, collateral id, output index and Zelid. You can supply your KDA address. I'll also need you to hit start in Zelcore once ready. I will email you to start your node. That's all I'll ever need from you. Be careful with scammers and impersonators.
### This is hard
Yes, it can be complicated, frustrating and discouraging to get a node up and running. Our goal is to reduce the friction as much as possible. If you still have questions after reading the documentation, please create a ticket in Discord and we'll walk through the process together.
# Neoxa - Getting Started
{% embed url="" %}
Check out CryptoJar's walk-through with the required steps to get your node up and running.
{% endembed %}
Getting your Neoxa node up and running is a straight-forward process. The first thing to do is to complete your purchase on the Node Orbit site. This will reserve an IP address, which can be seen in the dashboard. This will be required in a later step.
* Download the latest Neoxa QT [wallet](https://github.com/NeoxaChain/Neoxa/releases)
* Open the wallet and allow it to complete the syncing process
* Next, secure your wallet by encrypting it through the "Settings" menu and selecting "Encrypt Wallet."
* Generate a new receiving address within the wallet.
* It is crucial to create a backup of your wallet.dat file. To do this, navigate to "File" and choose "Backup Wallet." Make sure to store this backup in multiple secure locations.
* Send 1 million Neoxa to self (this is the current collateral amount for Neoxa masternodes).
* Wait for 1 confirmation to complete the transaction.
Below is an example of what the protx quick\_setup command should look like. You can copy the example below into a Notepad and edit it with your values.
```
protx quick_setup "cfc14de1e1cbe2bf619a6d152a0ade2e4841b6df8817327bbdf8f69e868a553c" "0" "192.168.10.1:8788" "GJ4XMMYGem8AV36yyojdiMfVAp9kEueTmq"
```
Transaction ID: In your wallet, go to "Transactions," right-click the one you sent yourself earlier, and "Copy Transaction ID." Replace the Transaction ID in the example.
Collateral index: Go to "Tools" > "Debug console." Type "smartnode outputs" to check if it's 1 or 0. Adjust the example command if needed.
Your smartnode server IP and port: Replace the example IP with the IP supplied from the Node Orbit dashboard.
Fee address: This should be any address in your wallet that contains enough Neox to pay the fee (cannot be the address to which you sent the 1 million Neox). When you enter the "protx quick\_setup" command, it is considered a transaction and requires a small fee. 0.005 Neox is enough. In the Debug console, use "listaddressbalances" to display all addresses with a balance, choose one, and replace the address in the example command.
* Execute the "protx quick\_setup" command within the Debug console. Copy the **OperatorSecret** text that appears.
* From the Node Orbit dashboard, find your node, click Update Node and paste in this value which will finish the node provisioning process.
* If the node has a status of "Ready", then you have put in the proper key and your node will be on the blockchain shortly.
**PLEASE NOTE:**
**It will take around 52 hours before you get your first reward. If the status is READY then you're good and there's nothing to do except wait.**
**A new address will be created for you automatically in the same wallet that holds the collateral. You can only see this address once you get your reward. If the status is READY, then you will see the reward in your wallet.**
# Additional Resources
If your node has the PoSe banned status or you are moving your node from one IP to another, you'll need to do the following steps.
Your masternode is banned if it has the **POSE\_BANNED** status. You can unban your masternode by entering this command in your local wallet’s Debug Console:`protx update_service proTxHash ipAndPort operatorKey operatorPayoutAddress feeSourceAddress`
Details:
```
proTxHash: the proTxHash of your masternode. In the Masternodes tab on your local wallet, right-click on the banned node and choose 'Copy Protx hash'
ipAndPort: ipAndPort of banned masternode
operatorKey: znodeblsprivkey of the masternode, this is the key that you originally submitted.
operatorPayoutAddress: "" , if you set your operatorReward to 0 during registration
feeSourceAddress: an address in the local wallet that has NEOX to fund the transaction. Can be obtained with the listaddressbalances command
```
After running this command from your wallet, you should be able to then refresh your Dashboard. If the node status changes to "Ready" then you're good to go.
## Viewing Node in Wallet
Please ensure the following setting is checked in your wallet. This will allow you to see the node in your wallet.
Settings -> Wallet -> Enable Coin Control and Smartnodes
# Presearch - Getting Started
Getting your Presearch node running is extremely straight-forward with Node Orbit.
* Log into your [Presearch dashboard](https://nodes.presearch.com/dashboard)
* Copy your node registration code. Make sure you're copying the registration code and not the node API key.
* Paste your node registration code into your checkout screen
* After checkout, you will be able to see your node on the [Presearch dashboard](https://nodes.presearch.com/dashboard) where you can stake PRE to your node.
#### Checking your node status
From the Node Orbit dashboard, you can click **View Logs**. If you see 'node is listening for searches', then your node is properly configured. If you see an error message stating bad registration code, there's the option to **Update Node Data** to input a new registration code.
#### Can I switch from one VPS over to Node Orbit?
Yes, simply turn off your original nodes, wait at least an hour, and then proceed to purchase through Node Orbit. The system will provision your node automatically. We do pass the flags to auto-stake any disconnected nodes if they were properly turned off.
# Streamr - Getting Started
Please note that we recommend running with a node redundancy of at least 2 and having the same number of nodes running. We will run the nodes in different locations to help ensure they are up at all times. Our monitoring checks every 15 minutes for a successful TLS connection and either restart or move the node to a new server in the case where we cannot connect.
Step 1 - Purchase your node from nodeorbit.com
Step 2 - Register as an operator here:
{% embed url="" %}
Step 3 - After registering as an operator, fund your operator with DATA (Polygon network) tokens
Step 4 - Copy your Contract Address and enter it into the Node Orbit Dashboard
Step 5 - Copy your node address supplied in the Node Orbit dashboard into your Operator Hub.
Step 6 - Send a small amount of MATIC to your node address to cover gas fees from your MetaMask wallet. Your node address can be found on the Node Orbit Dashboard.
You can check your progress from within your Operator Hub. Ensure all Operator Status flags are checked green.
From the Node Orbit dashboard, click your Operator Hub link and ensure it takes you back to your Operator. If it doesn't work, you may have put in the wrong Contract Address.
### Auto-staker
To enable auto-staker, enable it from the Account tab. Note you can update any of the variables, but do this at your own risk. We recommend keeping the standard values provided.
## Common Errors
You may see an error in the status column on the dashboard. Please note that it may take a few minutes for an error to go away after updating.
**Invalid operator contract address** - You have uploaded the wrong contract address. You'll need to update it again manually.
**Node Address not Funded** - Make sure to fund MATIC to the Node Address to pay gas fees.
**Update Node Address in Operator Link** - Your operator does not have your Node Address loaded in.
If your Operator Status says that your nodes are not running or reachable, make sure to verify using a [port checker ](https://www.ipfingerprints.com/portscan.php)to verify the ports are open. This may be an issue on the operator page itself and not the node. Check that your IP and port 32200 is open. You can also try a different browser.
# Timpi Guardian - Getting Started
Getting your Guardian node up and running is a straight-forward process. The first thing to do is to complete your purchase on the Node Orbit site. This will reserve an IP address, which can be seen in the dashboard. This will be required in a later step.
* Purchase your NFT through Timpi's portal
* Register your node on and use the IP address found on the dashboard in the registration process
* Copy your node's GUID from the Timpi dashboard
* Find your node on the Node Orbit dashboard, click Actions -> Update Node Data. Submit your GUID to assign it to your node
# Timpi Synaptron - Getting Started
* Purchase your NFT through Timpi's portal
* Copy your node's GUID from the Timpi dashboard
* Find your node on the Node Orbit dashboard, click Actions -> Update Node Data. Submit your GUID to assign it to your node
Please note that Synaptrons won't start automatically like other nodes. They are manually provisioned for now, and may take up to 8 hours to start. After it starts, it may take up to 30 minutes to see it reflected on the Timpi dashboard.
# Timpi Collector - Getting Started
Click Actions -> Enter wallet address
# Timpi Geocore - Getting Started
* Purchase your NFT through Timpi's portal
* Copy your node's GUID from the Timpi dashboard
* Find your node on the Node Orbit dashboard, click Actions -> Update Node Data. Submit your GUID to assign it to your node
# Beamable Checker - Getting Started
1. Go to [https://nodes.beamable.network](https://nodes.beamable.network/)
2. Connect the wallet that owns your license(s)
3. Select "Activate" and approve the transaction in your wallet.
4. If you wish to delegate operation to another wallet (recommended), select "Delegate License" and input the public address found on the Node Orbit dashboard.
5. Confirm the transaction and pay the associated gas fee.
6. You should now see an indication that your license was successfully delegated to that wallet.
7. Repeat this process for each of your licenses.
8. From the Node Orbit dashboard, enter in your license ID and wallet address.
# Beam Validator - Getting Started
After you purchase your node, go to the Node Orbit dashboard and you should see your node running. Note that the node will be running, but you will need to delegate to it to earn rewards.
### Node Status
Syncing - Your node has not yet been delegated to.
Validating - You have successfully delegated your node and it's validating the network.
### Is Bootstrapped
Once the node is fully synced, this will change from False to True. You can then proceed with delegating to your node.
### Delegation
To delegate, go to the [validator page](https://delegation.onbeam.com/validators) and fill in the Node ID, BLS Public Key and BLS Proof of Possession. You can set the commission percentage and minimum stake duration to whatever you want. You will need to stake at least 20,000 BEAM.
Click *“Finish Registration”* and approve the pending transaction. Once it is completed, most often within a few minutes, the Validator Manager contract will respond by adding your new validator node to the validator set and it will be visible as active in the validator list [here](https://delegation.onbeam.com/).
# Xardian Node - Getting Started
Step 1: Delegate your license using the link found on the dashboard or visit [https://xprotocol.org/assign-wallet/NODE\_ADDRESS](https://xprotocol.org/assign-wallet/%7Bgenerated) and put in your node address found on the dashboard
Step 2: Fund your node's operator address with .005 ETH on Base network
Step 3: Fund your wallet address with .005 ETH on Base network
Step 4: Submit your wallet address to the Node Orbit dashboard
If you start a node, and later add a license, make sure you re-submit your wallet address so that it picks up the additional license.
Please note that if you skip the first step, it will look like your node is running and submitting assertions but you won't receive rewards. Make sure to delegate your license.
# Muse - Getting Started
Go to the [Muse Node Owner Portal](https://nodes.moonveil.gg/). Click \[Connect Wallet] and sign in witht he wallet that holds your Muse NFT Licenes.
From there, delegate your licenses to the addresses found on the Node Orbit dashboard.
You should see the status of your licenses from the owner portal or the Node Orbit dashboard.
# Gr1d Circuit Node - Getting Started
1 - From the Node Orbit dashboard, enter in your node address that holds your license.
2 - Visit , connect your wallet that holds the node licenses, click delegate and enter the burner wallet address found on the Node Orbit dashboard.
3 - Fund your burner wallet address so the node can submit transactions
# KIP Checker Node
[Checker Node Owner Hub](https://kipprotocol.gitbook.io/kip-node-documentation/running-your-checker-node/checker-node-owner-hub-guide)
### Step 1
Log in to the [Node Owner Hub](https://nodehub.kip.pro/) and initiate the delegation flow under `Node Delegation` tab. Choose Delegate to Service Provider.
Enter the public address found in the Node Orbit dashboard
### Step 2
Click Actions -> Enter the Token ID that you just delegated, not your wallet address. This is a 3-5 digit number.
# DIN Chipper Node - Getting Started
You'll need to purchase a DIN license prior to running a node. Each subscription will be able to run 10 licenses.
Obtain your license keys from the 'My Node' page.
Go to the Node Orbit dashboard, click Actions and paste your license content.
### **Claim Rewards**
On 'My node' , Click the ‘Claim’ button to receive your network rewards in $xDIN, while your network profit in $BNB will be automatically transferred to your wallet.
Details about the rewards mechanism can be found in the [Node Rewards](https://dinlol.gitbook.io/din-cook-data-for-ai/how-to-join/chipper-node-explained/node-rewards).
# Rivalz Validator Node - Getting Started
Purchase your node
Go to the Node Orbit dashboard and you will see a Node ID to delegate your license to. Copy that ID and go to to delegate.
On the website, you'll need to connect your wallet.
Enter the "Node ID" and "Token Amount"
Click the “Delegate” button after signing transaction.
If the transaction is successful, the UI will automatically reload.
Go back to the Node Orbit dashboard and click Run Node.
# PlayAI - Getting Started
Step 1: Delegate your license on the [Node Explorer](https://nodeexplorer.playai.network/) page to the address found on the dashboard
Step 2: Fund your node's operator address with .005 ETH on Base network
Step 3: Fund your wallet address with .005 ETH on Base network
Step 4: Submit your NFT ID to the Node Orbit dashboard
# Xai - Getting Started
{% embed url="" %}
Check out CryptoJar's walk-through of setting up your Xai node.
{% endembed %}
Getting your Xai node up and running is a straight-forward process. A node address will be provided. This is unique to you. You will need to delegate your keys to this address. Your node address will then be able to run all licenses associated with your Sentry wallet's address.
STEP 1 - Purchase your [Xai node](https://xai-foundation.gitbook.io/xai-network/xai-blockchain/sentry-node-purchase-and-setup/step-1-purchase-a-sentry-key) and be sure to finish the KYC process.
STEP 2 - Purchase your node from Node Orbit
STEP 3 - [Delegate your keys to your Node Orbit Operator](https://xai-foundation.gitbook.io/xai-network/xai-blockchain/sentry-node-purchase-and-setup/common-troubleshooting-steps/how-do-i-delegate-my-keys-to-another-users-operator).
* From the dashboard, click Actions -> Delegate keys. This will open up a URL to assign your wallet to your node.
* Click "Assign wallet to Sentry"
* Sign the transaction
STEP 4 - Fund your node address with .005 AETH to cover gas fees. **Omitting this step means you won't get any rewards.** Your node address is different than your wallet address.
STEP 5 - Go to Actions->Update node data and submit your Sentry Wallet address. This will start your node. You can now view the logs, or restart your node if necessary.
####
#### Node Address Not Funded
**Please note that if you do not fund your node address with .005 AETH to cover gas fees, you will NOT receive any rewards. Make sure this address has funds to cover gas for your rewards.**
# Sophon Light Node - Getting Started
Operator Address - Address for you to delegate your license. Each operator address can have up to 20 licenses delegated.
Wallet Address - Your wallet address to receive rewards
Percentage - The percentage this node will charge as rewards fee from delegators. Basically, rewards are calculated based on delegated amount, and this percentage defines how much goes to you as node operator, and the rest goes to delegators. It must be a decimal from 0.00 to 100. Only 2 decimals allowed.
# Myria - Getting Started
Proceed to to purchase a Myria node
After you purchase, you will simply submit your API key into the Node Orbit dashboard to get your node started.
Please note:
If your node is running elsewhere, the node won't start after uploading your API key. From the Myria dashboard, change the API key before submitting it.
# Hychain - Getting Started
{% embed url="" %}
Check out Fecoxa's video walkthrough on implementing a node (in Portuguese)
{% endembed %}
{% embed url="" %}
Check out Seroy's video walkthrough on implementing a node (in Portuguese)
{% endembed %}
Getting your Hychain node up and running is a straight-forward process. A node address will be provided. This is unique to you. You will need to delegate your keys to this address. Your node address will then be able to run all licenses associated with your wallet's address. Make sure to do these steps on the Hychain network, even if your license is on ETH.
STEP 1 - Purchase your Hychain node.
STEP 2 - Purchase your subscription from Node Orbit
STEP 3 - Delegate your keys to your Node Orbit node address by going to
Paste in the node address found on the Node Orbit Dashboard
Make sure you delegate on the Hychain network and not on the ETH network. If you're on ETH, then make sure to BRIDGE over to the Hychain network!
STEP 4 - Fund your node address with 30 TOPIA to cover gas fees. **Omitting this step means you won't get any rewards.** Your node address is different than your wallet address.
STEP 5 - Go to Actions->Update node data and submit your wallet address. Submit the public address from your wallet that contains the keys. This will start your node.
#### Node Address Not Funded
**Please note that if you do not fund your node address with TOPIA to cover gas fees, you will NOT receive any rewards. Make sure this address has funds to cover gas for your rewards.**
**Please note: Do NOT delegate on the ETH network.**
**Payouts go to the wallet that holds the licenses.**
#### Dashboard
Status: Let's you know if the node is running or there are any errors
Node Address: Public address of the node running your license.
Balance: This is your node balance to pay gas fees for claiming and asserting.
Rewards to Claim: This shows you how much is available to claim. Note that every time you claim, you will need to pay gas fees.
Claimed Rewards: This is how much you have claimed thus far.
Actions -> Claim Rewards: This will claim rewards. Note that this will cost you in gas fees so claim sparingly. Also note that after claiming, you will see the transaction in the explorer in the Internal Transactions tab.
# Aethir Checker - Getting Started
Log in to the [Checker Owner Portal](https://app.aethir.com/) and initiate the delegation flow under `Licenses` tab
Enter the public address found in the Node Orbit dashboard
Click Actions -> Enter the License ID that you just delegated
# GPU.net Validator - Getting Started
Follow the steps in the GAN Chain documentation to get your node ready
[Create an SS58 Address](https://docs.gpu.net/gan-chain-l1/validator-node-setup/creating-an-ss58-address)
[Add the Validator Node](https://docs.gpu.net/gan-chain-l1/validator-node-setup/adding-validator-in-the-explorer)
[Add the SS58 account to the explorer](https://docs.gpu.net/gan-chain-l1/validator-node-setup/adding-your-ss58-account-to-ganscan-explorer)
From the Node Orbit dashboard, copy your key
#### Adding the validator in the explorer
Goto the staking section of the block explorer:
Here you can see an option to add validator (Validator with + symbol).
Click that option and a new pop-up will come like this :
Here you have to select your account (SS58 that you added) and the value which you want to bond, minimum currently is **100 GPoints** i.e. the **staking amount**.
Click on next and you would be able to see the following window:
In the 'keys from rotatekeys' section paste the key that you created in the previous step. Click on 'Bond & Validate'.
Then enter your account password and select 'Sign & Submit'.
Note: After this process, you should be able to see your account in the **pending validators.** However, your validator will start making blocks and earning rewards from the next era (1 Era is 24 hours).
# Gala - Getting Started
{% embed url="" %}
Check out JustNodes' walkthrough on setting up your Gala node
{% endembed %}
First step is to purchase a license from Gala's website.
Go to your Gala Node Dashboard, click API Key in the menu. From here, click Generate API Key. Ensure your node is activated.
You will simply submit your API key into the Node Orbit dashboard to get your node started. Make sure the license is activated.
On the dashboard, ensure your Workload is running. If no workloads were found, then your license may not have been activated.
# Playa3ull - Getting Started
Submit your License key into the Node Orbit dashboard to get your node started.
# Carv - Getting Started
Please note you'll need to purchase a license to run this node. Node Orbit simply will be running the node for you.
{% embed url="" %}
Check out JustNodes' walkthrough on implementing Carv
{% endembed %}
Open your Carv wallet to delegate your license
Enter the public address found in the Node Orbit dashboard
Click Actions -> Enter the License ID that you just delegated
# Firo - Getting Started
### Getting Started
First step is to ensure you have the latest [Firo wallet](https://firo.org/get-firo/download/) and you have already obtained your **1000 FIRO** (preferably just a bit more to cover fees when you’re transferring around).
#### Step 1: Encrypt and Backup your wallet on your Desktop wallet
If you haven’t done so already, make sure you encrypt your wallet on your **local desktop wallet** (PC/Mac/Linux).
Go to **Settings > Encrypt Wallet.**
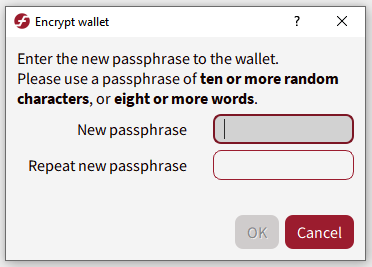
After you have encrypted your wallet, it is also recommended to do a backup via **File > Backup Wallet**. It is recommended to store this wallet on a separate physical drive or pen drive. The wallet.dat is encrypted so even if the wallet.dat is exposed, if your password is long enough, it will be secure.
**Please don’t forget your password! No one can help you if you lose your password.**
#### Step 2: collateral your 1000 FIRO on your Desktop wallet
Your collateral address is where you will be storing your 1000 FIRO.
You can create the collateral address in two ways: using the Receive tab, OR in the Debug Window
**Receive tab:**
Click on the Receive tab. Enter a label for your collateral address in the Label field and click on Request Payment. A window should pop up with a Firo address.
**Debug Window:**
Go to Help > Debug Window > Console and type in
`getnewaddress`
In one single transaction, send **exactly 1000 FIRO** into the masternode collateral address that you created. Do not send 500 and then another 500. **It has to be in one single transaction. Do not tick subtract fee from amount.**
It is not recommended to send it direct from an exchange as they might deduct certain withdrawal fees resulting in less than 1000 FIRO in that transfer.
Wait **1 confirmation** for this transaction to be valid as your masternode collateral. When done correctly, the transaction id and transaction index will appear when you execute this command in the Debug Console:
`evoznode outputs`
**Special Notes only for those who are creating more than one masternode:**
If you are doing more than one masternode, special care is required to ensure that you are creating collateral properly. You do not want to break the previous 1000 FIRO collateral you just made by taking funds from that collateral.
To do this, on your **local desktop wallet** turn on coin control by going to **Settings > Options > Wallet** and click on **Enable coin control features.** This will enable control of which funds you are using when making your next 1000 FIRO collateral.
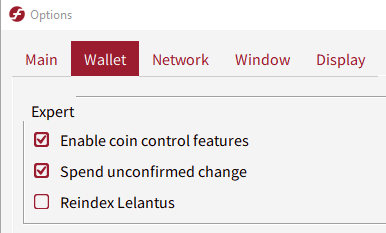
Then go to your Send tab, and you will see **Coin Control Features**. Click on **Inputs**. You should see your 1000 FIRO collateral there. Right click and click **Lock Unspent**. This means that when making your new collateral, your wallet will not touch these funds.
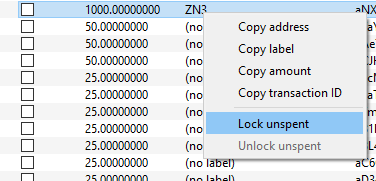
Once you have done this, you can make the next 1000 FIRO collateral for your next masternode. Repeat this everytime you have made a new masternode.
You can always verify you’re doing this correctly by going into **Help > Debug Window** and typing **evoznode outputs** which would display all masternode capable collaterals.
#### Step 3: Creating ownerAddress, payoutAddress, feeSourceAddress and operatorKey/operatorPubKey
*a, b, and c can be generated through Receive tab or the Debug Window, just like the collateral address above.*
**a. ownerAddress**
Proof that you own the masternode. Must be in the same wallet as collateral. **DO NOT USE THE COLLATERAL ADDRESS AS OWNER ADDRESS.**
**DO NOT SEND COINS TO THE OWNER ADDRESS. DO NOT USE IT AS PAYOUT ADDRESS. DO NOT USE THIS ADDRESS FOR ANY OTHER PURPOSE.**
**b. payoutAddress**
Address the masternode will pay out to. Can be inside the same wallet or an external address.
**c. feeSourceAddress**
An address with funds to pay the transaction fee for registering your masternode. To get a list of addresses with funds, enter the following command in the Debug Window:
`listaddressbalances 0.01`
If you do not have any, you can create an address and send some Firos there. You can then use the address as feeSourceAddress.
**d. operatorKey/operatorPubKey**
In Debug Console, enter bls generate. The output will be similar to this:
```
{
"secret": "2e551176c4cd5a2e26f3a1c61f151487e013f7095ffbc0f62b5c2b251e7bd84c",
"public": "89d395bc75e99527e80d3bbd408a5b41bbf37e7e1e26c5924da734008d1aa4a3f5e42a968bef541cb1c9a0899280d29b"
}
```
**secret**: This is your operatorKey (for protx) and is what you submit in the Node Orbit checkout page.
**public**: This is your operatorPubKey (for protx)
You cannot **regenerate the same pair of keys,** but you can generate the public key from the secret key if you lose the public key.
#### Step 7: Registering your masternode
***The registration process must be done on your local wallet***
Your node will take a few hours to sync with the blockchain. Once you have done all the above, you can now register your masternode with the following command:
`protx register collateralHash collateralIndex ipAndPort ownerAddress operatorPubKey votingAddress operatorReward payoutAddress feeSourceAddress`
where
```
collateralHash: transaction ID of your 1000 FIRO collateral (from "evoznode outputs")
collateralIndex: transaction index of your 1000 FIRO collateral (from "evoznode outputs")
ipAndPort: the IP address and port of your masternode
ownerAddress: the ownerAddress, generated in Step 3
operatorPubKey: the "public" part of the "bls generate" output, generated in Step 3
votingAddress: "" (defaults to ownerAddress)
operatorReward: 0
payoutAddress: A valid Firo address for your masternode payouts, generated in Step 3
feeSourceAddress: A valid Firo address with funds in it to fund the masternode registration, from Step 3
```
Before you are able to enter the command, you must first unlock your wallet:
`walletpassphrase YOURPASSWORD 60`
This command will unlock your wallet for 60 seconds and returns a (null) message when successfully executed.
If everything is correct, you should get a transaction ID.
**Example**
```
protx register 4950f88867b69760d3cd7c1f53531340f6723eb8f7d7f00730abfa12c5fe10e0 0 207.148.122.12:8168 TRVDAxJwaZYFfmti4aTeKCByz1jbMq8Jy4 995b3e1e2a65ce960a8cc7d305c5914b7f60e888c338c1f3317efbdcac58e82ecc110315ce03f49d9d387ff35c2796ad "" 0 TEZ8M8Fgp8h4HvUjXtjz3krYraRtySiXdw TQGmCxUQHK2xKGYNyeqGdSYQqfEAB2hjtd`
```
Details:
```
collateralHash: 4950f88867b69760d3cd7c1f53531340f6723eb8f7d7f00730abfa12c5fe10e0
collateralIndex: 0
ipAndPort: 207.148.122.12:8168
ownerAddress: TRVDAxJwaZYFfmti4aTeKCByz1jbMq8Jy4
operatorPubKey: 995b3e1e2a65ce960a8cc7d305c5914b7f60e888c338c1f3317efbdcac58e82ecc110315ce03f49d9d387ff35c2796ad
votingAddress: ""
operatorReward: 0
payoutAddress: TEZ8M8Fgp8h4HvUjXtjz3krYraRtySiXdw
feeSourceAddress: TQGmCxUQHK2xKGYNyeqGdSYQqfEAB2hjtd
```
Registration is successful once the transaction containing your registration is mined and is included in a block. To check, copy the transaction ID and enter it here: [explorer.firo.org](https://explorer.firo.org/)
Once the transaction is mined, the nodes you just registered should appear in the masternodes tab in the wallet.
**At this point, you should see the Status "Ready" on the Node Orbit dashboard.**
#### Unbanning your masternode
***The unbanning process must be done on your local wallet***
Your masternode is banned if it has the **POSE\_BANNED** status. You can unban your masternode by entering this command in your local wallet’s Debug Console:`protx update_service proTxHash ipAndPort operatorKey operatorPayoutAddress feeSourceAddress`
Details:
```
proTxHash: the proTxHash of your masternode. In the Masternodes tab on your local wallet, right-click on the banned node and choose 'Copy Protx hash'
ipAndPort: ipAndPort of banned masternode
operatorKey: znodeblsprivkey of the masternode, usually inside firo.conf on the masternode. This is different than the operatorPubKey!
operatorPayoutAddress: "" , if you set your operatorReward to 0 during registration
feeSourceAddress: an address in the local wallet that has FIRO to fund the transaction. Can be obtained with the listaddressbalances command
```
Please ensure that you have fixed the problem that caused the ban before unbanning your masternode otherwise it will get banned again. [A more detailed guide is here.](https://github.com/firoorg/firo/wiki/Troubleshooting-masternode%3A-PoSe-score-and-PoSe-ban)
After unbanning, ensure that you check the status of the masternode in both the wallet and the masternode itself.
# Raptoreum - Getting Started
* Send 1.8 million RTM to self (this is current collateral amount)
* Wait for 1 confirmation
#### 2. Build protx command for control wallet
Here is an example protx quick\_setup command:
```
protx quick_setup "c4bbcde9771668fa640c263d4b964f688b0f039f7b684e715d92e4012369fea6" "1" "194.113.73.87:10226" "RFbWv94ZfueciwVVpHLMdqFayaXAS4sBxP"
```
The structure from left to right is:
* **Transaction ID:** In your wallet go to “Transactions” right click the one you sent yourself earlier and “Copy Transaction ID”. Replace the Transaction ID in example.
* **Collateral index:** Tools > Debug console. Type smartnode outputs to check if 1 or 0. Adjust example command if needed.
* **Your smartnode server IP:10226** Replace example IP with your Smartnode server IP, leave port as is.
* **Fee address:** This is any address in your wallet which contains enough RTM to pay the fee (cannot be the address which you sent the 1 million RTM to). When you enter the protx quick\_setup command it is a transaction and needs to be paid for. It is a very small amount 1/2 an RTM is more than enough. In Debug console do “listaddressbalances” to show all addresses with a balance, choose one and replace address in example command.
Copy the **OperatorSecret** text that appears.
From the Node Orbit dashboard, find your node, click Update Node and paste in this value which will finish the node provisioning process.
# Osmium - Getting Started
### Please note that these steps are rather complicated. Please work slowly and take a note of every command you enter and the output from each one.
### STEP 1
Open your Windows wallet.
**Go to Tools -> Debug console.**
### STEP 2
Type the following RPC command, to create an address for the masternode fee:
**getnewaddress**
Example output
**BHu7BFFtfsU3FgfUX1y5JnAQNVZ28348UK**
### STEP 3
Go back to your wallet overview.
**Press on the toolbar button "Send".**
Enter the address from the RPC command **“getnewaddress”** behind the text **"Pay To:". (Example: BHu7BFFtfsU3FgfUX1y5JnAQNVZ28348UK)**
Enter the following amount of coins behind the text **"Amount:": 5**
Press on the button **"Send".**
Wait until the transaction is confirmed by **4** blocks.
### STEP 4
Go back to the console of your wallet.
Type the following RPC command, to create an address for the masternode collateral:
**getnewaddress**
Example output
**BRrfbPvmgds7XFvU4xhsCVegDM4Do6EyYp**
### STEP 5
Go back to your wallet overview.
Press on the toolbar button **"Send".**
Enter the address from the RPC command **“getnewaddress”** behind the text **"Pay To:". (Example: BRrfbPvmgds7XFvU4xhsCVegDM4Do6EyYp)**
Enter the following amount of coins behind the text **"Amount:": 500 OSMI**
Press on the button **"Send".**
Wait until the transaction is confirmed by **4** blocks.
### STEP 6
Go back to the console of your wallet.
Identify the transaction with the following RPC command:
**masternode outputs**
Example output
**{**\
**"618599438df959fc0647ad1895808ba0fef96282bf24eb177134cb0c329c8d41": "1"**\
**}**
### STEP 7
Generate a BLS key pair with the the following RPC command:
**bls generate**
Example output
**{**\
**"secret": "5120af1f913b8a4b459e19cc3ef3f865ba891404853fa317f348635b347e12ef",**\
**"public": "050564992464a87643d273e87334fda1e8beb52e9605b9cef2fe73eb3a063f12c8f03a6fa4f07e26a1e9e5175e155c91"**\
**}**
### STEP 8
Type the following RPC command, to create an address for the owner of the masternode:
**getnewaddress**
Example output
**B6ZhT7SR1BQSUYrab3isCGEmJGwndSxGod**
Type the following RPC command, to create an address for used for proposal voting:
**getnewaddress**
Example output
**B5HXmW9iYzZq89LdH8eUXEzSwwwEaQ3XKS**
Type the following RPC command, to create an address to receive the masternode reward:
**getnewaddress**
Example output
**BLvahoF6T7b8NY5wACtDoS9NzWPjRhNKuL**
### STEP 9
Prepare the ProRegTx transaction by modifying the following line.
**protx register\_prepare 618599438df959fc0647ad1895808ba0fef96282bf24eb177134cb0c329c8d41 1 159.89.31.63:12972 B6ZhT7SR1BQSUYrab3isCGEmJGwndSxGod 050564992464a87643d273e87334fda1e8beb52e9605b9cef2fe73eb3a063f12c8f03a6fa4f07e26a1e9e5175e155c91 B5HXmW9iYzZq89LdH8eUXEzSwwwEaQ3XKS 0 BLvahoF6T7b8NY5wACtDoS9NzWPjRhNKuL BHu7BFFtfsU3FgfUX1y5JnAQNVZ28348UK**
**618599438df959fc0647ad1895808ba0fef96282bf24eb177134cb0c329c8d41** - Transaction id from the RPC command “masternode outputs”.
**1** - Single digit from the RPC command “masternode outputs”.
**159.89.31.63:9969** - External IPv4 address of your VPS.
**B6ZhT7SR1BQSUYrab3isCGEmJGwndSxGod** - Address of the owner of the masternode.
**050564992464a87643d273e87334fda1e8beb52e9605b9cef2fe73eb3a063f12c8f03a6fa4f07e26a1e9e5175e155c91** - “public” value from the RPC command “bls generate”.
**B5HXmW9iYzZq89LdH8eUXEzSwwwEaQ3XKS** - Address used for proposal voting.
0 - Don't forget this 0
**BLvahoF6T7b8NY5wACtDoS9NzWPjRhNKuL** - Address to receive the masternode reward.
**BHu7BFFtfsU3FgfUX1y5JnAQNVZ28348UK** - Address to where you send the masternode amount fee.
Paste the modified line into your console.
Example output
**{**\
**"tx": "0300010001ac7584669c70526e0e338d6a2477dc648788140dd0dcbc5915878f9c632d129b0100000000feffffff01e551cd1d000000001976a9149385c0ceafd77df3619e604f4ce7d0317bbcbfae88ac00000000d1010000000000418d9c320ccb347117eb24bf8262f9fea08b809518ad4706fc59f98d439985610100000000000000000000000000ffff9f591f3f32ac1730a9104ead8b642345c1300e81c4d78e874de6050564992464a87643d273e87334fda1e8beb52e9605b9cef2fe73eb3a063f12c8f03a6fa4f07e26a1e9e5175e155c910929cbddb56d0fbd2993de634c3ed42de5a8455700001976a914b4b5864ed646cd8591a8ed996fa6c25de0b98bce88ac8f420b431efe6e62a55533099d2e99759767d38f94461325508afe3feadd0a9f00",**\
**"collateralAddress": "BRrfbPvmgds7XFvU4xhsCVegDM4Do6EyYp",**\
**"signMessage": "BLvahoF6T7b8NY5wACtDoS9NzWPjRhNKuL|0|B6ZhT7SR1BQSUYrab3isCGEmJGwndSxGod|B5HXmW9iYzZq89LdH8eUXEzSwwwEaQ3XKS|c8ebf2ae235d658e0809915348718dbb262f6884473c00448ba93e7ce4648070"**\
**}**
### STEP 10
Sign the ProRegTx transaction by modifying the following line.
**signmessage "BRrfbPvmgds7XFvU4xhsCVegDM4Do6EyYp" "BLvahoF6T7b8NY5wACtDoS9NzWPjRhNKuL|0|B6ZhT7SR1BQSUYrab3isCGEmJGwndSxGod|B5HXmW9iYzZq89LdH8eUXEzSwwwEaQ3XKS|c8ebf2ae235d658e0809915348718dbb262f6884473c00448ba93e7ce4648070"**
**BRrfbPvmgds7XFvU4xhsCVegDM4Do6EyYp** - “collateralAddress” value from the RPC command “protx register\_prepare”.
**BLvahoF6T7b8NY5wACtDoS9NzWPjRhNKuL|0|B6ZhT7SR1BQSUYrab3isCGEmJGwndSxGod|B5HXmW9iYzZq89LdH8eUXEzSwwwEaQ3XKS|c8ebf2ae235d658e0809915348718dbb262f6884473c00448ba93e7ce4648070** - “signMessage” value from the RPC command “protx register\_prepare”.
Paste the modified line into the console of your wallet.
Example output
**ILrWvvZRZeZhnfFtNwd087rwGsiPJH28GfmoPfjSDhUcEY+joeUd82/lqVnO0FD0V1L8vpjYju92fjMPITVScGI=**
### STEP 11
Submit the ProRegTx transaction by modifying the following line.
**protx register\_submit 0300010001ac7584669c70526e0e338d6a2477dc648788140dd0dcbc5915878f9c632d129b0100000000feffffff01e551cd1d000000001976a9149385c0ceafd77df3619e604f4ce7d0317bbcbfae88ac00000000d1010000000000418d9c320ccb347117eb24bf8262f9fea08b809518ad4706fc59f98d439985610100000000000000000000000000ffff9f591f3f32ac1730a9104ead8b642345c1300e81c4d78e874de6050564992464a87643d273e87334fda1e8beb52e9605b9cef2fe73eb3a063f12c8f03a6fa4f07e26a1e9e5175e155c910929cbddb56d0fbd2993de634c3ed42de5a8455700001976a914b4b5864ed646cd8591a8ed996fa6c25de0b98bce88ac8f420b431efe6e62a55533099d2e99759767d38f94461325508afe3feadd0a9f00 ILrWvvZRZeZhnfFtNwd087rwGsiPJH28GfmoPfjSDhUcEY+joeUd82/lqVnO0FD0V1L8vpjYju92fjMPITVScGI=**
**0300010001ac7584669c70526e0e338d6a2477dc648788140dd0dcbc5915878f9c632d129b0100000000feffffff01e551cd1d000000001976a9149385c0ceafd77df3619e604f4ce7d0317bbcbfae88ac00000000d1010000000000418d9c320ccb347117eb24bf8262f9fea08b809518ad4706fc59f98d439985610100000000000000000000000000ffff9f591f3f32ac1730a9104ead8b642345c1300e81c4d78e874de6050564992464a87643d273e87334fda1e8beb52e9605b9cef2fe73eb3a063f12c8f03a6fa4f07e26a1e9e5175e155c910929cbddb56d0fbd2993de634c3ed42de5a8455700001976a914b4b5864ed646cd8591a8ed996fa6c25de0b98bce88ac8f420b431efe6e62a55533099d2e99759767d38f94461325508afe3feadd0a9f00** - “tx” value from the RPC command “protx register\_prepare”.
**ILrWvvZRZeZhnfFtNwd087rwGsiPJH28GfmoPfjSDhUcEY+joeUd82/lqVnO0FD0V1L8vpjYju92fjMPITVScGI=** - Output from the RPC command “signmessage”.
Paste the modified line into the console of your wallet.
Example output
**9c76272b7ef2a7456c84158424eb138bd3636b09aa2beae973bbed921f1f7868**
From the Node Orbit dashboard, you can simply update your node with the secret key generated from the bls generate command.
# Refund Policy
Refunds will be provided within the first 3 days of service. After 3 days, no refund will be offered upon cancellation.
Note that credit will be applied towards your account when upgrading node tiers.